How to Set Up Your 1raket Page
Welcome to 1raket! Follow these simple steps to create your creator page and start receiving support from your community.
Get Started NowSign Up for an Account
Create your free account using Google or email. It only takes a minute!
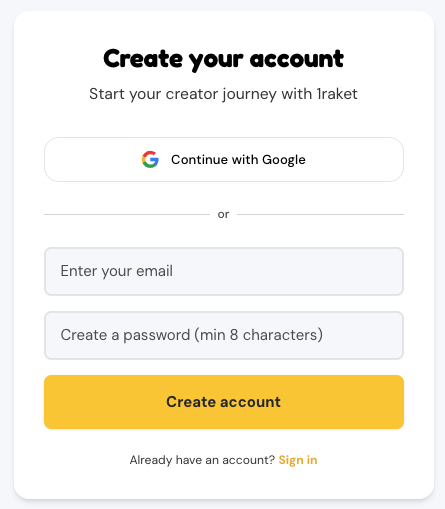
Step-by-step:
- Visit 1raket.com and click 'Get Started'
- Choose sign-up method (Google or Email)
- Verify your email if using email sign-up
- You'll be redirected to the onboarding wizard
Choose Your Username
Pick a unique username that will be part of your creator page URL.
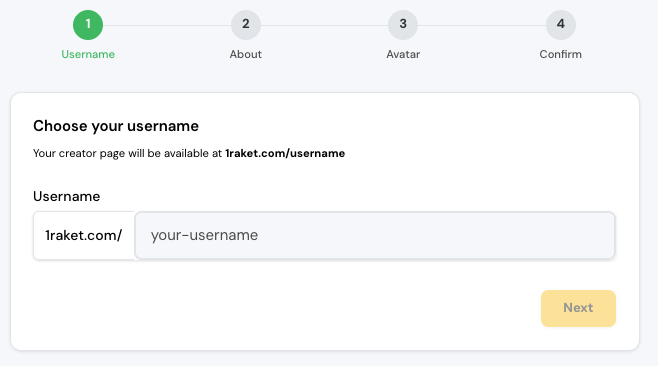
Step-by-step:
- Type your desired username (3-30 characters)
- System checks availability in real-time
- Preview your URL: 1raket.com/your-username
- Click 'Next' when available
💡 Pro Tip
Choose carefully - usernames cannot be changed later!
Tell Your Story
Introduce yourself and explain what you create to your supporters.
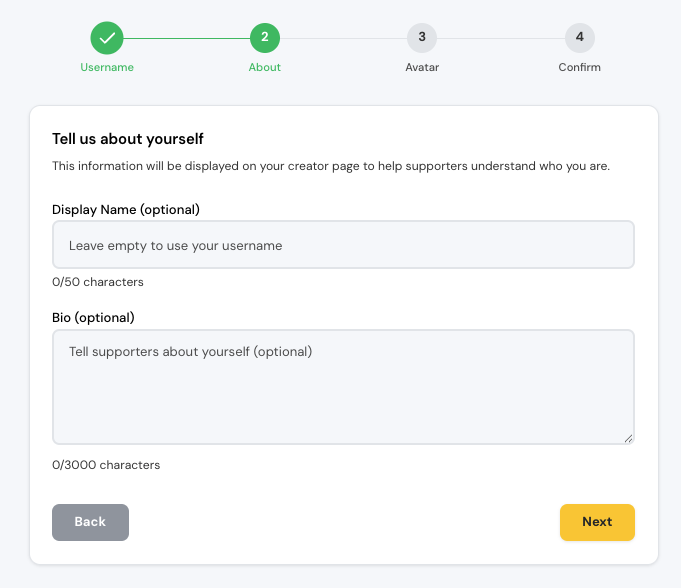
Step-by-step:
- Enter your display name (optional)
- Write a bio describing your creative work
- Up to 3,000 characters for your bio
- Both fields are optional with defaults
💡 Pro Tip
Be authentic! Tell supporters why their support matters.
Add Your Profile Picture
Upload a photo that represents you or your creative work.
Step-by-step:
- Click 'Choose Image' and select a photo
- Supported: JPEG, PNG, WebP (max 5MB)
- Adjust size with the zoom slider
- Preview shows how it appears as a circle
💡 Pro Tip
This step is optional - you can skip and add a photo later!
Review and Launch
Review your profile and launch your creator page to the world!
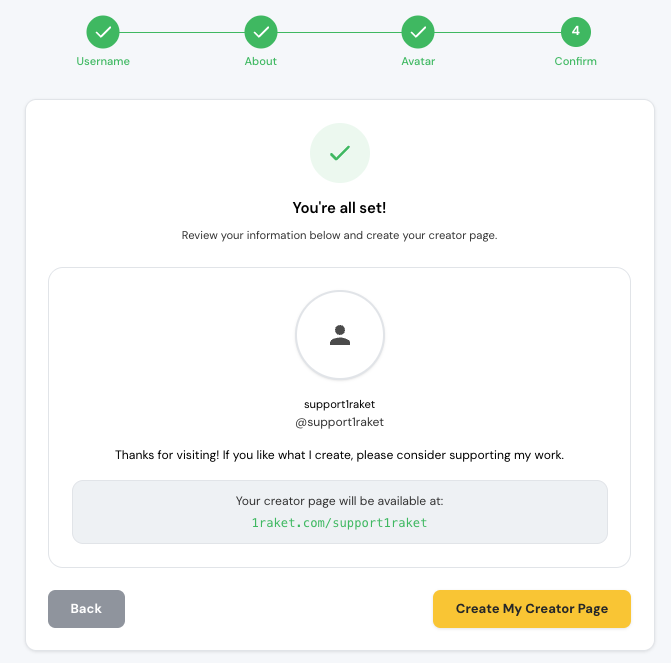
Step-by-step:
- Check your profile preview
- Verify your URL and information
- Click 'Create My Creator Page'
- You'll be redirected to your new page
💡 Pro Tip
All set! Your page is now live and ready to share.
What Comes Next?
Your creator page is live! Here are the next steps to grow your support.
Customize Your Page
Upload a Cover Photo
Go to Settings in your dashboard and add a wide banner image (recommended: 1200×400 pixels) that appears at the top of your page.
Add Gallery Images
Showcase your work by uploading gallery images. Arrange them in your preferred order and update them regularly.
Set Up Support Tiers
Create custom donation amounts with descriptions and special perks for different support levels.
Create Posts
Share updates, images, and links to keep your community engaged and informed about your creative journey.
[Screenshot: Dashboard customization options placeholder]
Start Receiving Support
Support Options
Supporters can give one-time donations, subscribe to memberships, purchase from your shop, or buy exclusive content.
When Someone Supports You
You will receive email notifications and see support details in your dashboard with supporter names, messages, and amounts.
Getting Paid
Set up your payment method in Settings, choose your payout schedule, and manage your earnings and tax information.
Thank Your Supporters
Send personalized messages, give shout-outs on social media, and make your supporters feel valued and appreciated.
[Screenshot: Support notification and dashboard placeholder]
Frequently Asked Questions
Need More Help?
For detailed guides and troubleshooting, visit our Help Center or contact our support team.
Ready to Start Your Creative Journey?
Join thousands of Filipino creators who are earning through tips, memberships, and sales from their fans.
Create Your Page Now